Hey there, fellow tech enthusiasts and curious minds! Today, we’re diving into the intriguing world of Temperature Transmitter Calibration. Don’t worry if that sounds a bit intimidating – we’re here to break it down for you in the most approachable way possible. So, grab your favorite beverage, settle in, and let’s embark on this calibration journey together!
What Exactly is Temperature Transmitter Calibration?
Alright, let’s start with the basics. transmitter calibration is like giving your trusty old thermometer a tune-up. Just like your car needs an occasional check to make sure it’s running smoothly, a temperature transmitter requires calibration to ensure it’s giving you the most accurate temperature readings.
Why Does Calibration Matter?
Imagine this: you’re baking a batch of your famous chocolate chip cookies. You set the oven to 350°F as your recipe instructs, but what if your oven’s temperature display isn’t accurate? Your cookies might come out underbaked or overbaked. That’s where calibration comes in – it guarantees that your temperature readings are spot-on, whether you’re baking cookies or running a complex industrial process.
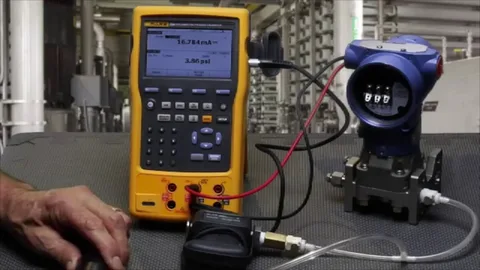
The Calibration Process Unveiled
Step 1: Preparation
Before you dive into the calibration process, you’ll need a few tools:
- Calibrator: This nifty device generates a known and stable temperature.
- Thermocouple: A temperature sensor that measures the output of your transmitter.
- Screwdrivers: You might need these to adjust the transmitter settings.

Step 2: Connect and Compare
- Connect your thermocouple to both the calibrator and the temperature transmitter.
- Power up the transmitter and let it stabilize.
Step 3: Make Adjustments
This is where the magic happens:
- Zero-Point Calibration: Adjust the transmitter so it reads accurately at the lower end of the temperature scale.
- Span Calibration: Fine-tune the transmitter’s reading at the upper end of the scale.
Pro Tips for a Seamless Calibration Experience
- Frequency Matters: Regular calibration ensures consistent accuracy. Depending on the application, consider calibrating every few months.
- Documentation Is Key: Keep a record of your calibration dates, readings, and any adjustments made. This helps track performance over time.
- Environmental Factors: Calibrate in an environment close to the actual operating conditions for the best results.
Conclusion
So there you have it, folks! Temperature transmitter calibration demystified in the friendliest way possible. Remember, calibration is like giving your devices a high-five for a job well done. It ensures accuracy, and reliability, and keeps your processes running smoothly.
The next time you’re baking those cookies or overseeing an industrial process, you’ll have a newfound appreciation for the behind-the-scenes heroics of transmitter calibration. Stay curious and keep exploring the fascinating realms of technology – who knows what wonders you’ll uncover next?
And with that, we wrap up our exploration of transmitter calibration. Until next time, keep tinkering and keep calibrating!
Stay calibrated, stay accurate!